Development Environments
Table of Contents
Graphene Code and Files
Open Source program
Language uses (mainly): Graphene-Core(C++), python
-
Graphene-Core (C++) - Graphene Blockchain implementation and command-line interface.
Graphene-FC - Fast-compiling C++ library
Graphene python - Fully featured client-side library for the Graphene Blockchain - written entirely in python.
Graphene-UI - Fully featured Graphical User Interface / Reference Wallet for the Graphene Blockchain.
Graphenejs - JavaScript tools for Graphene Encryption and Serialization.
Graphenejs-ws - Javascript websocket interface for Graphene
Beet - Beet is a stand-alone key/identity-manager and signing app for Graphene, heavily influenced by Scatter
Graphene Mobile App - The mobile app for bitshares blockchain
(more…)
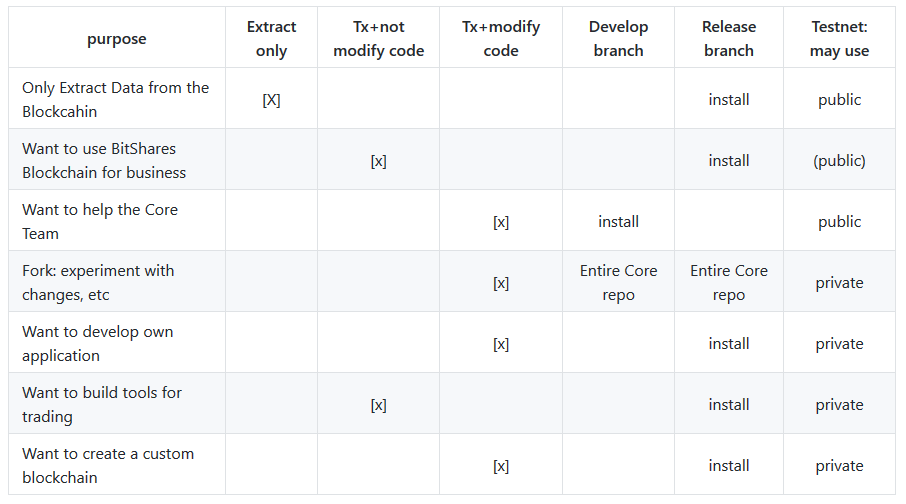
What’s your interests?
What would you like to know more about Graphene Blockchain? Graphene Core is the Graphene blockchain implementation and command-line interface.
If yo do not have a Graphene account yet, you can use Graphene UI wallet (wallet.gph.ai ) to create your Graphene account. Here is the latest Graphene-UI – Release information.
If your interests are trying and learning Graphene features, you might want to use Graphene TestNet to experience them. If you are a developer who is interested to contribute to the Graphene Core team, you could download a developer branch and learn more about Graphene-Core current Project might be a good start. Select an appropriate branch when you install Graphene-Core.
After you know which branch to download, your next step is the installation of Graphene-Core. Check the Graphene Installation Guide and select your Operation System to follow the installation steps.
Check out the Graphene communities and join to meet other GPH holders!
Graphene Core: Projects Guide
If you are interested to know or involve Graphene-Core developments, you will find the contribution guide, current project, issues and plans in this section.
Project Guide and Milestones
Graphene-Core (Team)
The Graphene-Core team is a team of developers who manage the Graphene-Core repository code and handle the issues that are submitted by other developers. The team creates project plans for next release(s) and delivers the result to the Graphene community.
Roles
improving
maintaining
upgrading protocol if needed
making Project plans for the future release
creating/ announcing Release
supporting the Graphene community/ answering questions
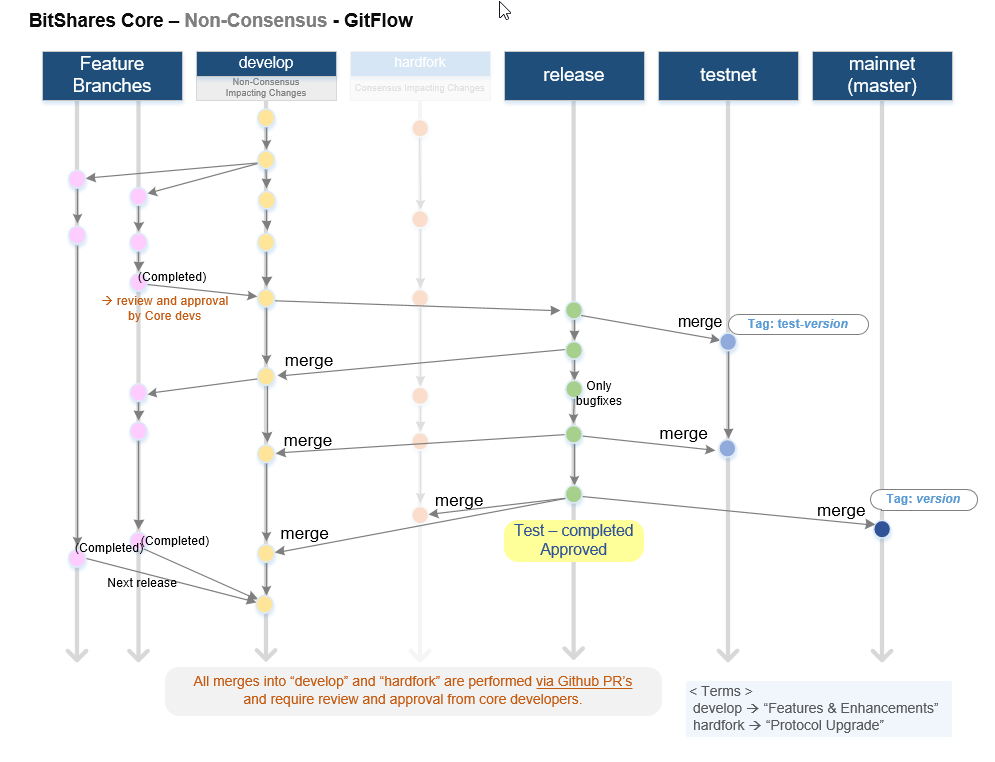
Graphene Core: GitFlow
Purpose
The purpose of this document is to describe and define how changes flow into our code and through the various stages of development until it finally goes into production.
The general idea is based on git-flow
For our purposes, the general concept behind gitflow has been extended to allow for these additional needs:
We have two different types of releases, mainnet and testnet, with a master-like branch for each one.
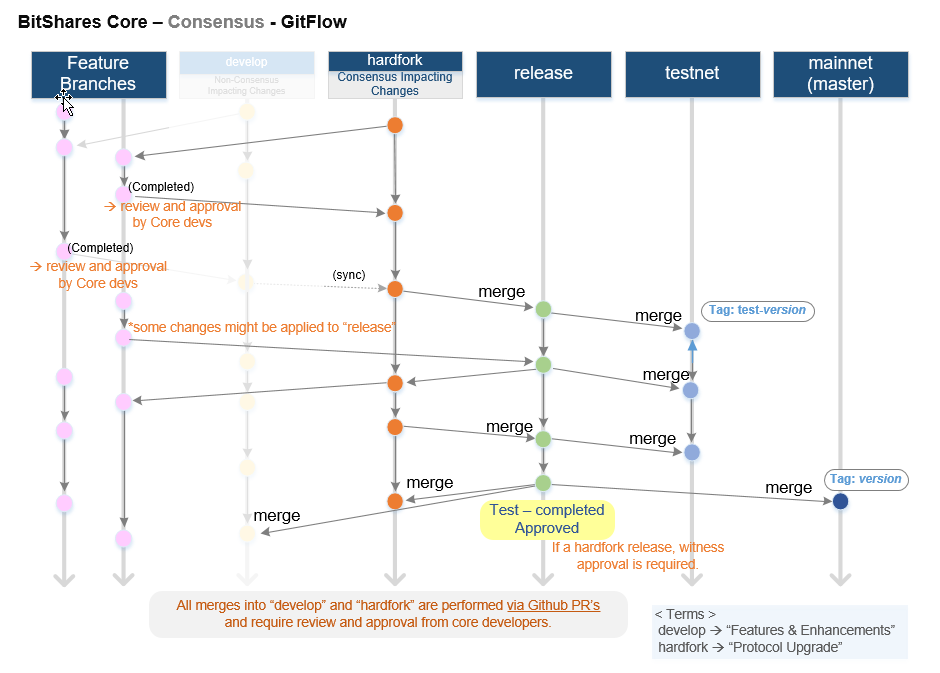
We have to distinguish Consensus Impacting Changes (aka hardforks) from Non-Consensus Impacting Changes.
Goals To Achieve
Maintain two independent release versions, testnet and mainnet.
Decouple development from releases, i. e. maintain the ability to create emergency bugfixes for current release without bringing incomplete new features into production.
Separate consensus-related changes from non-consensus-related changes.
Keep development branches compatible with mainnet.
Basic Rules
Development always happens in private feature-branches. The only exception is a change that must be distinguished in the destination branch (typical example: hardfork date in testnet).
Features are merged after they are reasonably complete, i. e. they come with unit tests that provide reasonable coverage and do not report any errors.
Completed features that are not consensus-related are merged into develop.
Completed features that are consensus-related are merged into the hardfork branch, with a hardfork date in the far future.
All merges into develop or hardfork are performed via github PR’s and require review and approval from core source (if the PR is created by a core dev at least one other core dev must review and approve).
To maintain a clean history and make reviewing and merging easier, feature branches must be rebased onto current develop (or hardfork) before creating a PR.
Merges are always done as real merges, not as fast-forwards, and not squashed.
Core devs coordinate regular merges from develop into hardfork.
Both develop and hardfork should always remain compatible with mainnet, i. e. a full replay must be possible.
How To Create a Release
For a release,
Bump stuff
Check whether need to bump
DB_VERSIONto force a replay after upgraded: if there is a data schema change, or logic change that affects historical data, the answer is yes.FC version usually has been bumped already during development, but it doesn’t harm if check again.
Bump docs sub-module which links to wiki.
A release branch is created based on develop or hardfork.
Update Doxyfile with the last version tag in release branch.
The release branch is merged into testnet.
For a hardfork release, the hardfork date is adapted directly on the testnet branch.
The testnet branch is tagged as test-version.
Bugfixes for the release are created on the release branch and merged into testnet. Additional test-versions are tagged as needed.
After sufficient testing, the release must be approved. In the case of a hardfork release, witness approval is required.
After approval, the mainnet hardfork date is decided and set in the release branch.
The release branch is merged into master, and a version tag is created on master. Create tag by git command line and then point the release to the created tag in github. This is needed for Docker to catch the new code.
The release branch is merged back into develop and hardfork.
The release branch is merged into testnet. This will produce a merge conflict for the hardfork dates, which must be resolved without changing the testnet hardfork date.
Update online code documentation by using updated Doxyfile as config file in the master branch. Send pull request with new content in html format. Send pull to https://github.com/graphene-blockchain/dev.graphene.works with new content in xml format.
Update date of last core download page.
14. Create binaries for linux, macos and windows. Once the tag name is known create binaries for this 3 OS. Attach them to release notes. Example: https://github.com/graphene-blockchain/graphene-core/releases/tag/3.0.0 Binaries names for this release:
Linux: Graphene-core-3.0.0-Linux-cli-tools.tar.gz
Windows: Graphene-Core-3.0.0-Windows-x64-cli-tools.zip
macOS: Graphene-Core-3.0.0-macOS-cli-tools.tar.gz
Note: Solving conflicts by github(web) will merge branches in unintended directions. Avoid solving this way, merge and resolve conflicts manually through the git command line. Conflicts generally occur when merging release to testnet.
How to: Snapshot Comparison in Graphene
Note 2: Follow command line github suggestion to resolve conflicts but at the end of the process you will not have permission to merge directly to testnet, never push the fix to release. Create a new branch and push there, then create a new pull request between testnet and new_branch, merge new_branch to testnet and release will be automatically added to the merge.
Note 3: When creating tag for testnet do it from the command line with git tag. Github don’t have the option to create a tag without a release.
Note 4: the tag commit can be changed. Don’t change tags on github. This is a source of confusion, and of irreproducible bug reports. Make new one is better (ex: test-2.0.180321b or wait 1 day).
Note 5: Do not mark releases as pre release unless there is a real new version coming immediately after. Never upgrade pre release to release as new emails to subscribers will not be sent when doing so.
How To Create an Emergency Fix
An emergency fix may become necessary when a serious problem in mainnet is discovered. The goal here is to fix the problem as soon as possible, while keeping the risk for creating additional problems as low as possible.
First of all, the problem must be analyzed and debugged. This happens, naturally, directly on the release version.
Presumably the developer who creates the fix will work on his private master branch. That is OK. But for publishing the fix, the following steps should be taken:
Emergency Fix Workflows
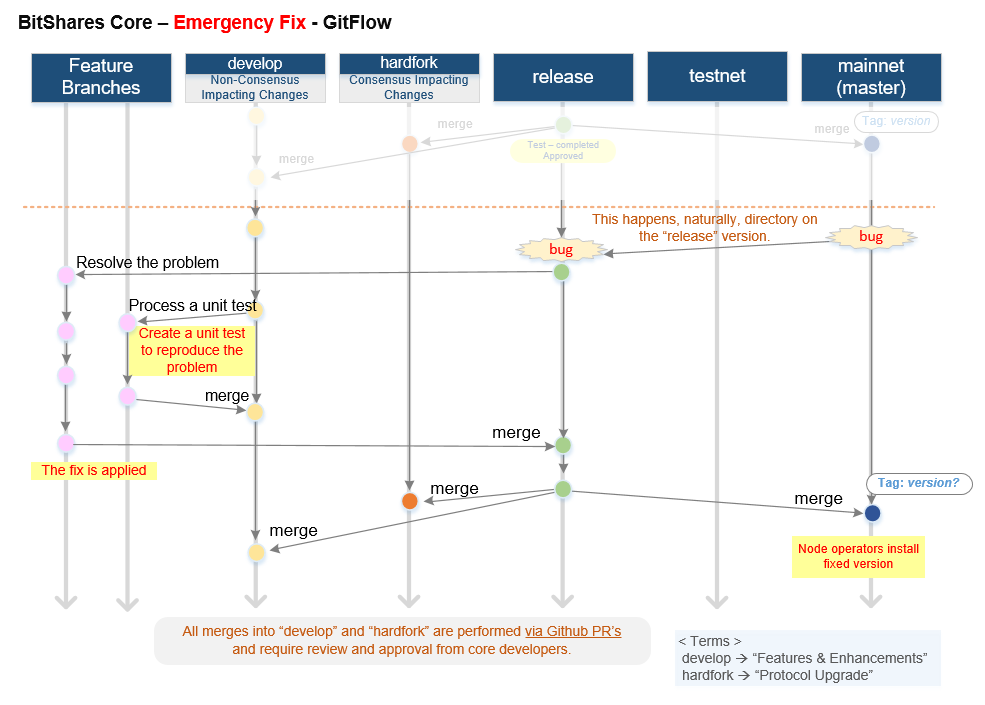
The fix is applied to the version of the release branch that was merged into
masterwhen creating the broken release version.The
releasebranch is merged intomaster, and a version tag is created onmaster.Witnesses update to the new version, and production continues.
A unit test is created on
developthat reproduces the problem.The
releasebranch is merged intodevelop, and it is verified that the fix resolves the problem, by running the unit test.The
releasebranch is merged intohardforkandtestnet.
How To Update the README.md
In general we want changes in the README to be visible fast in master.
Update the README.md of the
releasecandidate.Merge
releasetomaster.Merge back
releasetodevelop.Merge develop into
hardforkandtestnetif changes need to be visible in all the branches or wait until this merges occur naturally.